Clean Scanned Documents and Remove Unwanted Text Layers
Use a clean scanned documents workflow for paper scans, photographed forms, and archived pages where overlaid notes, stamps, or labels must be removed without breaking readability.
Supports JPG, PNG, WEBP
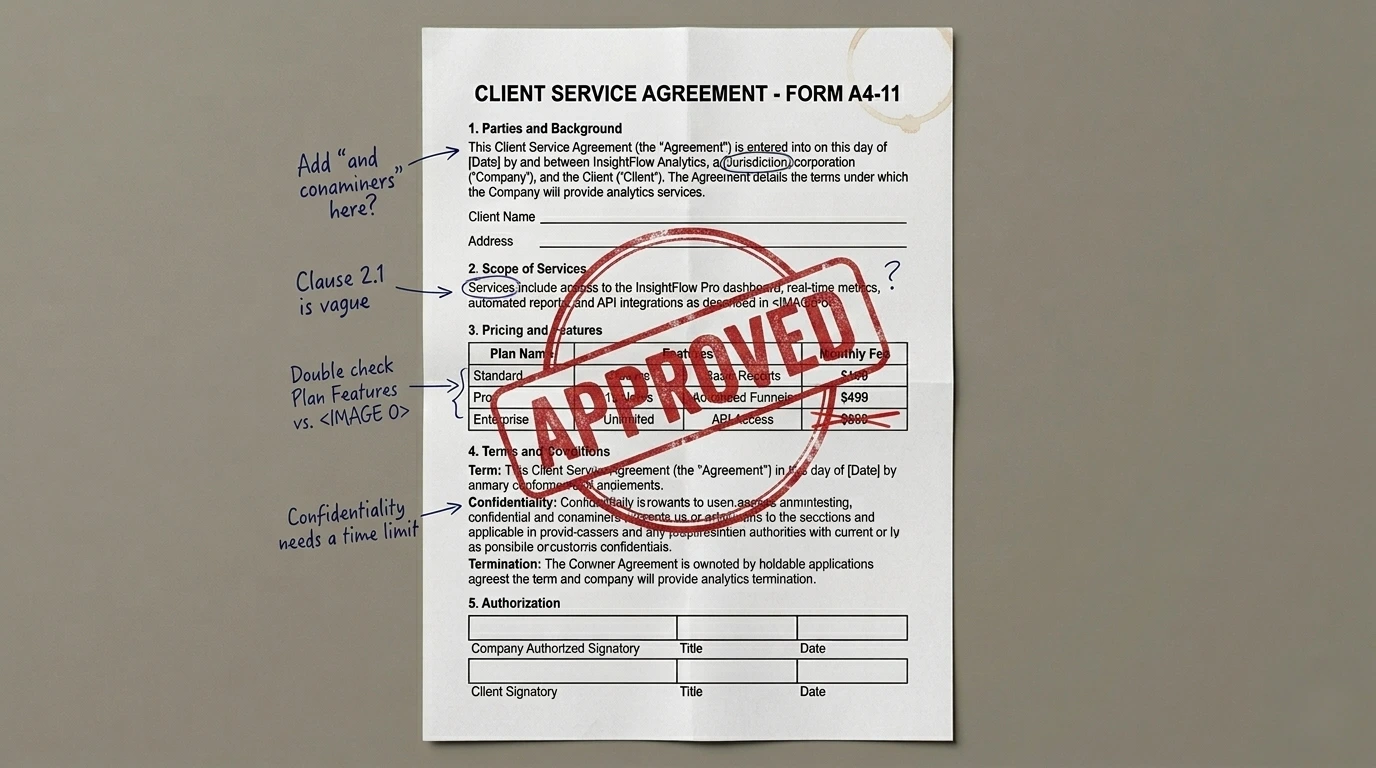
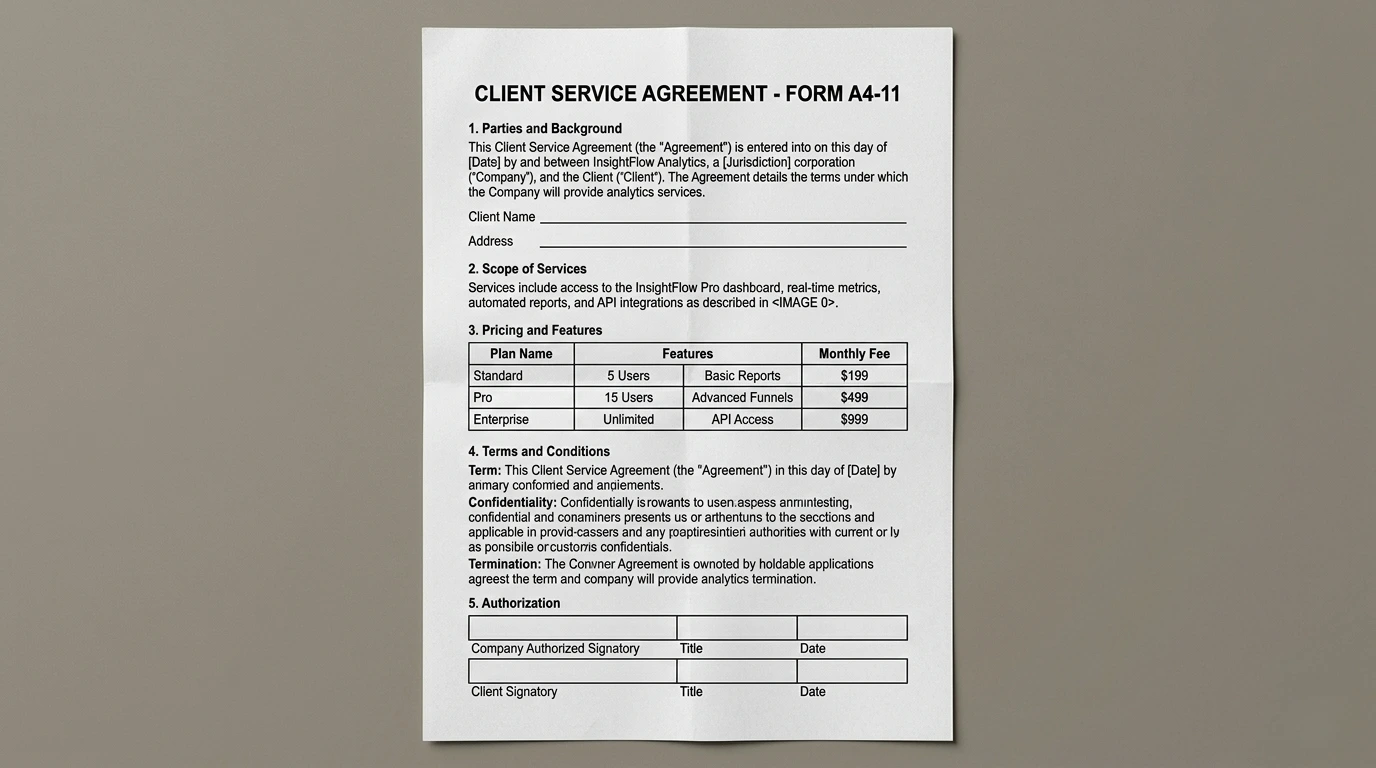
Before / After Comparison
Move the slider to compare before and after. Hover and drag horizontally to check edge quality.
How To Clean Scanned Documents While Preserving Legibility
Teams that need to clean scanned documents usually work with imperfect input: camera-captured paperwork, low-contrast scans, uneven lighting, wrinkles, shadows, and old print artifacts. In those conditions, deleting unwanted words is only part of the task. You also need to keep grid lines, paragraph rhythm, and character legibility in the untouched areas. A practical document cleanup workflow should therefore be careful, not aggressive. This page is built around that requirement. Upload the scan, run automatic detection to find overlaid or extraneous text regions, review the mask, and refine as needed before applying cleanup. Because scanned pages often contain dense structure, this controlled sequence gives better outcomes than trying to remove everything with one oversized mask.
There are many reasons to clean scanned documents in daily work. Legal teams may need to remove temporary review marks before sharing drafts. Operations teams may need to remove handwritten side notes from standard forms. Education teams may need cleaner worksheet templates for reuse. Historical archives may need to remove scanning artifacts from repeated photocopies. In all of these cases, quality is judged by readability and visual trust. If cleanup creates blurred blocks across text columns or table borders, the page looks edited and unreliable. That is why mask precision matters so much in document cleanup. The best approach is to isolate only unwanted layers while preserving nearby typography and line structure.
A recurring challenge is distinguishing between content that should stay and content that should go. On scanned pages, marks can look similar: a side annotation might resemble body text; a stamp might overlap a paragraph; a handwritten note may cut through ruled lines. To clean document scans accurately, start with automatic detection as a draft, then refine manually where document semantics matter. Use brush to include all of the unwanted mark, then use eraser to exclude adjacent printed text that must remain. Apply cleanup and inspect at high zoom. If small remnants remain, run one additional pass in that local area. This iterative method usually preserves document integrity better than all-at-once cleanup.
Another practical factor is output reuse. When you clean scan files for business workflows, the result may be used in contracts, internal reference packs, onboarding docs, or OCR pipelines. That means the cleaned page should remain visually coherent and easy to process downstream. Over-smoothed regions can reduce OCR accuracy and human readability. So the objective is not cosmetic perfection at any cost; it is a clean, trustworthy page that keeps structure intact. This workflow supports that by keeping the original, mask, and result in one session, making review easier before export.
If you work with multilingual files, document cleanup becomes even more sensitive. You may see mixed scripts, stamps, approval tags, and notes in different languages on the same page. A robust scanned-document routine should not assume one language pattern. Instead, it should provide a flexible first pass and reliable manual refinement controls. That is exactly the logic here: automatic detection gives speed, manual correction gives precision, and export gives a practical final asset for your next step.
For recurring operations, standardizing how you process scanned pages is a major time saver. Define a team process: upload page, run auto-detect, inspect key zones, refine mask edges, apply cleanup, and export. With the same sequence repeated across operators, output quality becomes more predictable and review time drops. This is especially valuable when handling batches of forms or archived files where small inconsistencies compound quickly.
If your goal is to clean scanned documents at scale while keeping confidence in readability and layout, start with one real sample from your workflow. Process it with this sequence and compare before and after at practical zoom levels. You will get a clearer baseline for what can be automated and where manual refinement is worth the extra seconds. That balance usually delivers the fastest route to clean, usable document assets.
More Cleanup Tools
Remove Logo from Image
Clean corner logos, brand badges, and embedded marks with auto detection plus refine.
AI Text Remover
Automatic text detection + manual refine in one editor session.
Erase Text from Image
One workflow for erase, delete, and remove text intent variants.
Remove Watermark
Remove logo-like overlays and transparent marks with cleanup controls.
Remove Object
Paint a custom mask to remove people, products, or distracting elements.
FAQ
Can I clean scanned documents without damaging body text?
Yes. Start with auto detection, then use eraser to protect nearby printed text before applying cleanup.
Does this work on photographed paper, not only flat scans?
Yes. It works on camera photos of documents, though uneven lighting may require extra mask refinement.
How do I handle overlapping stamps on text lines?
Mask only the stamp area first, apply cleanup, then run a second small pass if artifacts remain.
Is this suitable before OCR?
Yes. Cleaning overlay noise and annotations can improve OCR reliability in many practical cases.
What export formats are supported?
You can export cleaned pages in PNG, JPG, or WEBP depending on your workflow.